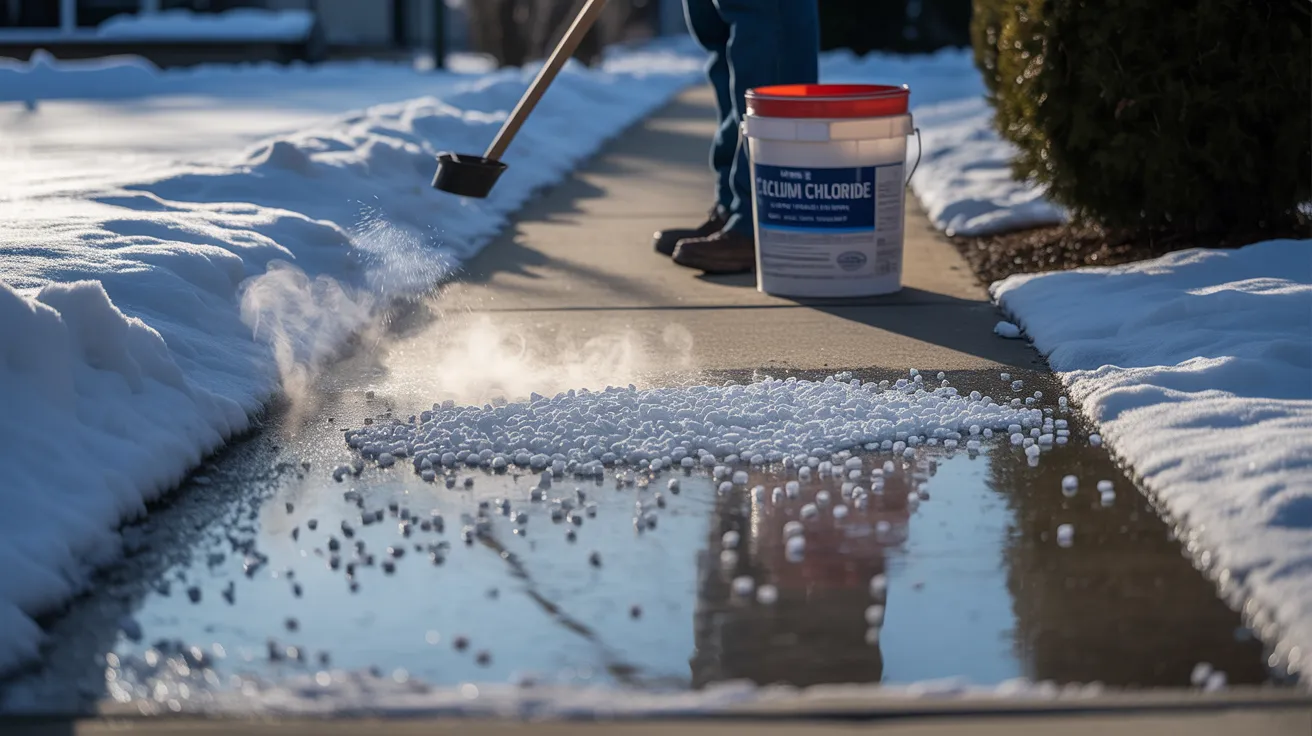
For Little website Chute ice melt selection, factor in pavement temperature. Use calcium chloride for temperatures reaching −25°F and choose rock salt near 15-20°F. Spread ice melt 1-2 hours ahead of precipitation, then target specific areas after shoveling. Make sure to calibrate your spreader and aim for thin, even coverage to reduce runoff. Avoid using chlorides near new or damaged concrete; think about using calcium magnesium acetate for sensitive surfaces. Safeguard pets by choosing rounded, low-chloride blends and wash entryways. Maintain storage sealed, dry, and away from other products. Looking for precise advice for dosages, timing, and sourcing?
Essential Points
- During winter in Little Chute, use calcium chloride for subzero temperatures and apply rock salt once pavement temps hit 15-20°F or warmer.
- Spread a minimal calcium chloride treatment one to two hours before snow to stop bonding.
- Calibrate your spreader; apply roughly 1-3 ounces per square yard and apply again only where ice persists after plowing.
- Protect concrete that's less than one year old and landscaped borders; apply calcium magnesium acetate near delicate areas and prevent pellets from touching greenery.
- Pick pet-safe circular granules and include sand to create traction under the product, then sweep any excess back onto pavements to reduce runoff.
The Science Behind Ice Melt Products
Although it looks simple, ice melt functions by reducing water's freezing point allowing ice converts to liquid at reduced temperatures. When you distribute the pellets, they break down into brine that seeps into the ice-snow interface. This brine breaks down the crystalline formation, reducing bond strength and creating a lubricated surface that enables you clear and shovel efficiently. As thawing initiates, the process pulls latent heat from the environment, which can slow down progress in extreme cold, so use thin, even application.
For maximum effectiveness, clear loose snow first, then work on the packed snow underneath. Make sure to protect sensitive surfaces and vegetation. Use sparingly, as excess salt increases unwanted runoff and ice formation when melting occurs and changes freezing temperatures. Apply a small amount after clearing to maintain a secure, grippy surface.
Selecting the Right De-Icer for Wisconsin Winter Weather
Understanding how salt solutions break bonds and begin the melting process, choose a de-icing option that functions optimally at the climate conditions you encounter in Wisconsin. Align your de-icer selection with forecasted temperatures and foot traffic to maintain safe and efficient walkways.
Use rock salt whenever pavement temps stay around 15-20°F and above. This option is economical and provides good traction, but it decreases significantly below its practical limit. If cold weather fall toward zero, transition to calcium chloride. This solution generates heat when dissolving, starts melting even at -25°F, and performs fast for controlling ice formation.
Apply a strategic approach: start with a minimal calcium chloride treatment before storms arrive, and then spot-apply rock salt for post-storm ice control. Make sure to calibrate spreaders, strive for consistent, minimal coverage, and apply again only as needed. Keep track of pavement temperature, instead of focusing solely on air temperature.
Pet Safety, Concrete, and Landscaping Considerations
As you focus on melting performance, safeguard concrete, plants, and pets by coordinating chemical composition and spreading rates to site sensitivity. Verify concrete curing age: stay away from chlorides on slabs less than one year old and on damaged or decorative concrete. Choose calcium magnesium acetate or potassium acetate around sensitive concrete surfaces; restrict sodium chloride during intense freeze-thaw conditions. For landscaping, avoid spreading product on planted areas; install protective barriers and sweep overflow to pavements. Select products with minimal chloride levels and include sand for traction when temperatures drop below product efficacy.
Safeguard animal feet with rounded granules and stay away from exothermic pellets that increase surface warmth. Wash entrance areas to minimize buildup. Encourage pet fluid consumption to reduce salt ingestion; use protective footwear where feasible. Place ice-melting products tightly closed, raised, and away from your furry friends.
Application Methods for Better, Quicker Results
Optimize your spreading technique for efficient melting and minimal cleanup: prepare surfaces before weather events, calibrate your equipment, and use the proper amount for the treatment and weather. Align pre-treatment with predicted snowfall: put down a thin preventive layer 1-2 hours before snow to prevent adhesion. Apply with broadcast spreading with a spread pattern overlapping boundaries without throwing material onto grass or entrances. Check application rates with a catch test; aim for 1-3 oz per square yard for most salts above 15°F, reducing amounts for high-performance blends. Target specific refreeze zones-north exposures, downspouts, and shaded steps. Following plowing, treat only bare spots. Collect unused product back into the active area to ensure grip, minimize indoor tracking, and decrease slip hazards.
Best Practices for Storage, Handling, and Environmental Management
Keep de-icers in airtight, marked containers in a cool, dry area away from incompatible substances and drainage areas. Use products with protective gloves, safety goggles, and calibrated spreaders to minimize contact with skin, inhaling particles, and overuse. Shield vegetation and waterways by spot-treating, sweeping up excess, and choosing chloride-reduced or acetate-based options where appropriate.
Proper Storage Conditions
While ice-melting salt seems relatively safe, treat it as a controlled chemical: store bags closed in a moisture-free, covered area above floor level to stop moisture absorption and caking; keep temperatures above freezing to avoid clumping, but separate from heat sources that could degrade packaging. Employ climate controlled storage to keep relative humidity below 50%. Utilize humidity prevention methods: moisture removers, vapor barriers, and secure door seals. Place pallets on racking, not concrete, and maintain airflow gaps. Inspect packaging every week for damage, crusting, or wet spots; rebag compromised material right away. Keep apart different chemistries (NaCl, CaCl2, MgCl2) to prevent cross-contamination. Set up secondary containment to contain brine leaks. Maintain storage at least 100 feet from wells, drains, and surface water. Label inventory and rotate FIFO.
Secure Handling Procedures
Safe material handling begins before opening any bag. Be sure to confirm material identification and safety concerns by reviewing labels and Safety Data Sheets. Pick suitable safety gear based on exposure hazards: Glove selection must match the material properties (nitrile for chlorides, neoprene gloves for mixed materials), factoring in cuff length and temperature ratings. Always wear safety glasses, long sleeves, and waterproof boots. Keep the material away from skin and eyes; avoid facial contact while handling.
Utilize a scoop rather than bare hands and maintain bag stability to prevent sudden spills. Position yourself upwind to reduce dust inhalation; a dust mask is beneficial when pouring. Sweep up minor spills and save for later use; avoid hosing salts into drains. Thoroughly clean hands and equipment when done. Maintain PPE in dry storage, examine for signs of damage, and replace worn gloves immediately.
Environmentally Conscious Application Techniques
After securing PPE and handling protocols, direct attention to minimizing salt use and runoff. Set up your spreader to distribute 2-4 ounces per square yard; spot-treat high-risk zones first. Apply treatment before weather events with a brine (23% NaCl) to minimize overall salt usage and improve surface bonding. Choose pellets or blends with sustainable origins and eco-friendly containers to minimize ecological footprint. Place bags on raised platforms with protection, away from floor drains; use sealed bins with secondary containment. Have cleanup materials available; collect and recycle excess material-don't hose surfaces. Maintain 5-10 feet buffers from waterways, wells, and storm inlets; place barriers or filters to control drainage. Remove leftover material following melt. Record spreading rates, ground conditions, and effectiveness to adjust quantities and prevent waste.
Little Chute's Guide to Local and Seasonal Food Shopping
Source ice-melting salt locally in Little Chute from early fall through the first hard freeze to control cost, supply risk, and product quality. Focus on suppliers that publish anti-caking agents, chloride percentages, and sieve sizes. Ask for Safety Data Sheets and batch consistency. Buy in advance at hardware outlets, farmers markets, and community co ops to bypass surge pricing during storms. Evaluate bagged and bulk options; analyze storage limitations and cost per pound.
Choose deicing materials based on ground conditions and temperature: spread sodium chloride during standard freezing, calcium chloride or magnesium chloride in severe conditions, and premium combinations for rapid brine formation. Keep sealed bags on pallets away from concrete and separate from drains. Use FIFO inventory rotation. Maintain protective gear such as spill kits, gloves, and eye protection accessible. Monitor application rates by storm to optimize restock quantities.
Questions & Answers
How Long Will Opened Ice Melt Maintain Its Effectiveness?
Used ice melt generally maintains effectiveness 1-3 years. You'll get the longest life if you control storage conditions: maintain it in a sealed, cool, and dry environment to minimize moisture uptake and clumping. The salts naturally attract moisture, accelerating chemical breakdown and reduced melting performance. Prevent exposure to temperature extremes, direct sunlight, and exposure to dirt and organic debris. Use airtight containers or reseal bags properly. If it cakes or forms brine, test on a small area and replace as needed.
Is it Safe to Combine Season Blends From Various Brands?
Yes, you can mix leftover blends, but ensure the materials are chemically compatible. Review product information to prevent mixing calcium chloride with sand-mixed or urea formulations that may bind together or create reactions. Prevent water exposure to avoid heat-generating clumping. Sample a minor portion in a dry receptacle. Match application timing to temperatures: select calcium chloride for freezing temperatures, magnesium mixtures in mild winter conditions, standard salt above 15 degrees. Keep the mixture in a sealed container with proper labeling, separated from metal surfaces and concrete-sensitive areas. Don protective equipment for hands and eyes.
How Can I Protect My Floors from Winter Salt Damage
Place an entry mat outside and a second, absorbent mat inside; remove shoes on a boot tray. Immediately clean up loose granules and clean remaining residue with a neutral pH cleaner to stop etching. Apply sealant to porous floors. Install rubber stair treads and remove debris from boots before coming inside. Example: A duplex owner decreased salt residue by 90% by implementing a coarse-fiber entry mat, a textured boot tray, and a weekly mop routine. Keep ice melt products in low-traffic areas.
Can You Get Municipal Rebates or Volume Discounts?
Indeed. Numerous local governments provide group buying options and government rebates for de-icing materials. Applications are usually submitted through municipal purchasing departments, including intended application, quantity needs, and safety documentation. Confirm participation criteria for residential properties, associations, or commercial entities, and validate shipping arrangements and storage requirements. Compare per-ton pricing, chloride content, and corrosion inhibitors. Ask about seasonal caps, lead times, and non-refundability. Keep records of application and save documentation to fulfill compliance requirements and environmental standards.
What Emergency Alternatives Work if Stores Run Out During Storms?
When ice melt supplies are depleted, there are still effective alternatives - avoiding accidents is essential. Apply sand to increase friction, create barriers with sandbags for water management, and spread gravel or kitty litter. Create a 50/50 solution of alcohol and water to break up ice formations; remove promptly. Utilize calcium chloride from moisture collectors if available. Place warming mats at entry points; keep clearing snow gradually. Put on anti-slip footwear, identify dangerous areas, and ensure proper ventilation when using alcohol solutions. Inspect drain areas to stop dangerous refreeze situations.
Summary
You've seen how ice melt controls wetness, minimizes melt-refreeze, and ensures traction. Pair de-icer chemistry to winter conditions in Wisconsin, protect surfaces, greenery, and pets, and apply with measured, metered methods. Clear leftover material, keep properly contained, and select sustainably to preserve soil and stormwater. Source locally in Little Chute for reliable inventory and cost efficiency. With strategic picking, precise distribution, and systematic handling, you'll preserve accessible routes-secure, moisture-free, and protected-through periods of winter weather extremes. Security, care, and management work together.